One of the most important phases in root crop chip processing is the drying stage. Proper drying assures appropriate moisture content.
The most common method used is direct sun-drying. Here, the chips are directly exposed to the sun but also dust and dirt, especially if placed on street-sides. Since marketing standards are strict regarding the moisture content, color and presence of foreign matter in the chips, sun-drying is really not that efficient. Besides, direct sun-drying is wholly dependent upon the weather; thus when rain comes, the chips must be gathered before they are completed dry, then set again when the rain drops.
The use of solar-dryers in the drying stage is one answer to the limitations of direct sun-drying. Products in solar dryer are safe from foreign particles such as dust and germs. The product’s taste and color are also better since drying is done under controlled conditions. The use of solar dryers requires a shorter period of time and less space. Moreover, the desired moisture content is easily achieved.
Solar dryers can be used in the processing of dried fruit like pineapple, papaya, mango and citrus. Meat and fish, seafood and garlic can also be dried here.
Materials:
- 4 pcs. 2″x2″x16″ tanguile wood
- 7 pcs. 1″x2″x16″ tanguile wood
- 30 pcs. 1″x1″x12″ tanguile wood
- 9 meter Acetate plastic
- 1 pc. 4″x8″ GI sheet G. No.22
- 17 meter 1/4 wire mesh
- 16 pcs. Hinge (2″x2″)
- 1 set Wheel 4″ diameter
- 2 kg. Nails 1 1/2″
- 1 gallon Flat black paint
- 1 gallon Thinner
How to make Solar Dryer
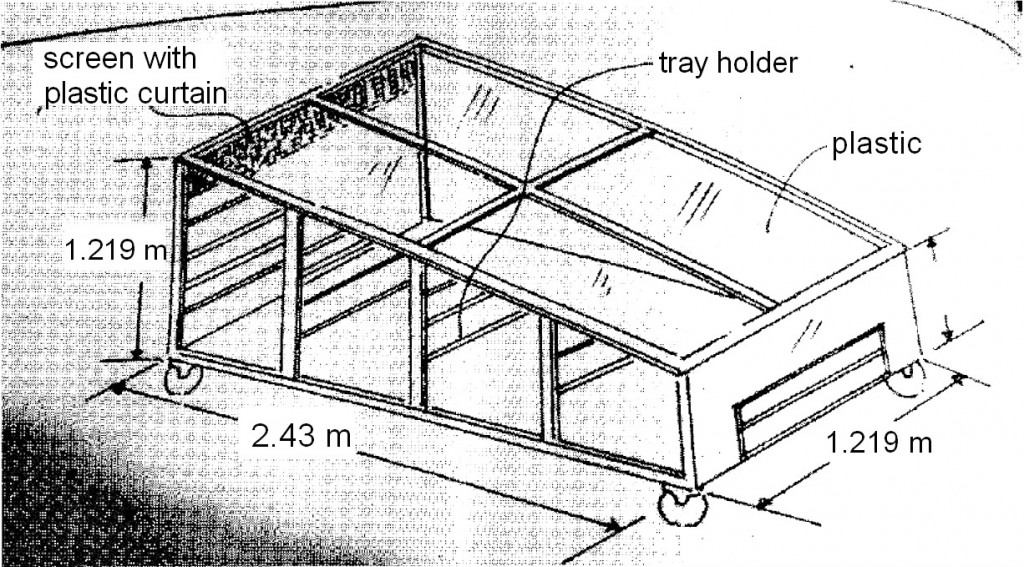
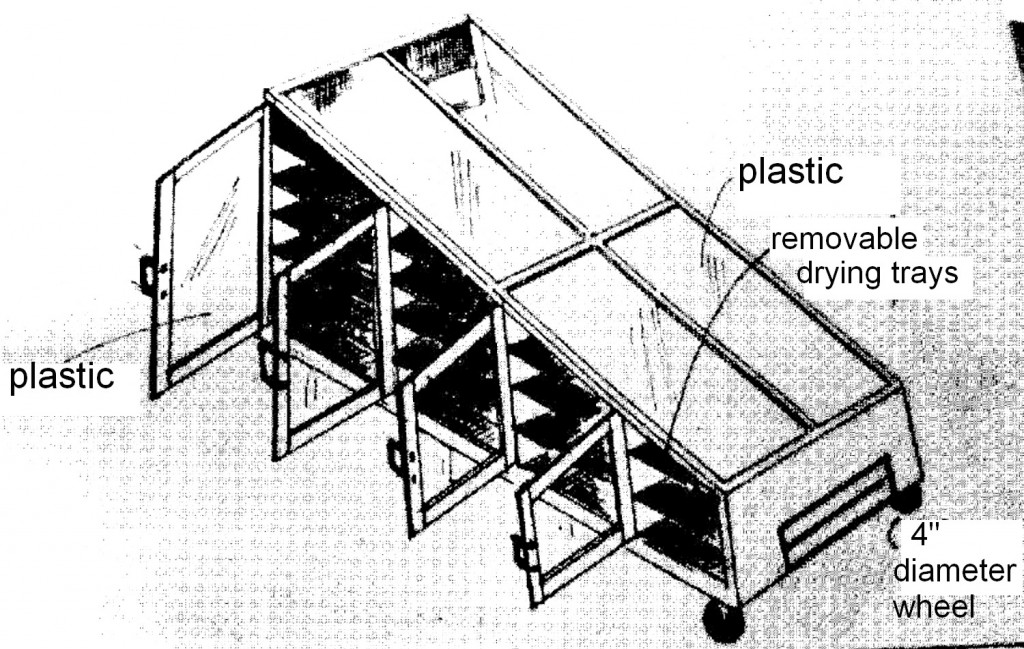
Assemble the dryer’s frame as shown in the illustration, using the materials previously prepared and set to the right sizes. Paint the assembled frame with flat black paint. Cover the frame’s surface, front and back sides with plastic. Leave openings on the lower part at the front and on the upper part at the back then cover with screen. Place a plastic curtain on the side, behind the screen of the back opening.
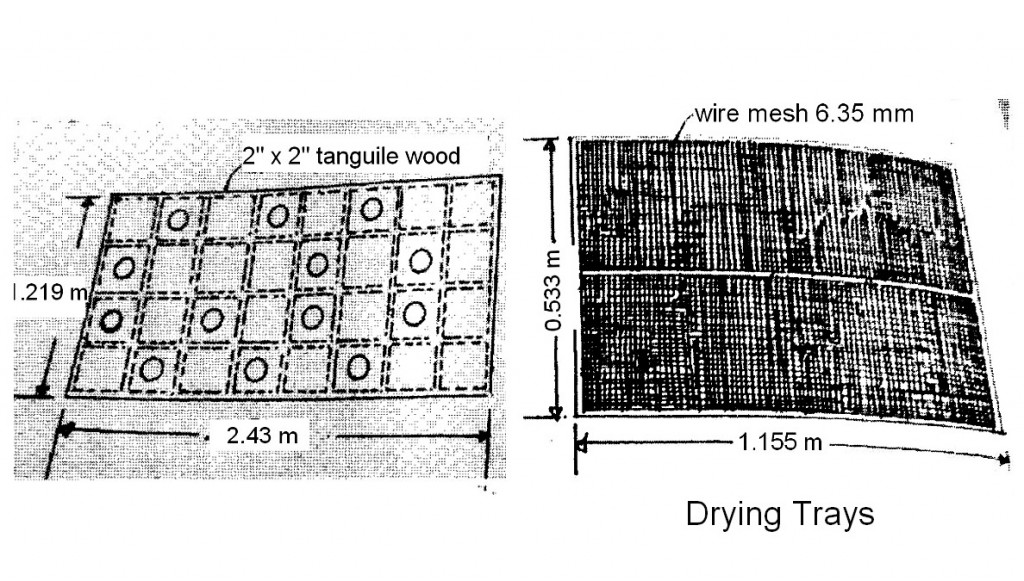
Cover the base of the frame with GI sheet with 13 holes measuring 2″ in diameter set according to the illustration. Paint both sides of the GI sheet with flat black paint. Attach the set of wheels on the four bottom corners.
Build eight doors, four for each side, and cover with plastic. Attach the door to each side using the 16 pieces of hinges.
Drying comes fast and easy with solar dryer. Drying is facilitated because solar dryers are specially designed for such purpose. The sun’s heat passes through the plastic covers. The air that comes in through the openings at the bottom and front side of the dryer is heated inside. The warm air rises and passes through the products being dried. The air containing the water vapor absorbed from the products goes out through the opening at the back of the dryer.


How to use a Solar Dryer
Set it where the sun shines directly and without obstructions like buildings and trees. The front side should face the south while the back, north. Clean the dryer’s plastic surface with water to ensure that dust does not accumulate. Properly set the products on the trays before drying. For wide slices such as mangoes, meat and others, leave a little space between each piece and avoid overlapping. If pale color is desired, cover the products before drying with black plastic mesh, then set the trays in proper position inside the dryer. Always close the doors when being used. Change the tray’s position two times a day to ensure even drying of the products. Drying time ranges from a half day to three days depending upon the weather and the product. Clean the bottom of the dryer and the trays with soap and water every use to remove syrup that dripped from the product. Dry the trays thoroughly before each use.
Regularly apply oil on the doors to avoid rusting. The plastic surface should be changed every six months. Yearly painting of the dryer using flat black paint is also advised.
Source: Agribusiness Opportunities, trc.dost.gov.ph